
OBS Best Recording Settings (2022)
Switch to Advanced Output Mode
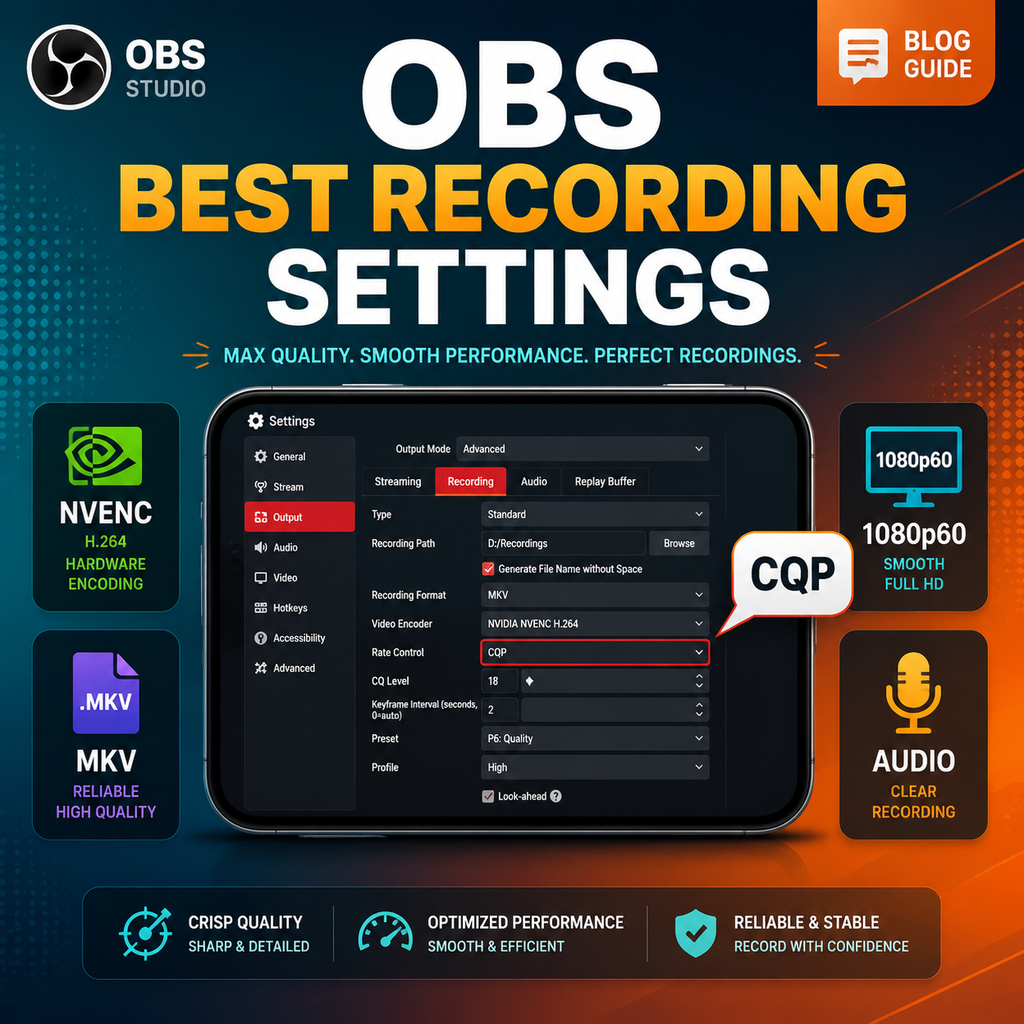
To unlock OBS's full recording potential, head to Settings > Output and change the Output Mode from Simple to Advanced. This reveals a suite of fine-grained controls for video encoding, audio tracks, and more. Once in Advanced mode, click the Recording tab to access the core settings that will define your recording quality and file size.
Choose the Right Recording Format
Your recording format determines compatibility and resilience. MKV is strongly recommended because it handles crashes gracefully—if OBS stops unexpectedly, your entire file won't corrupt. However, for editing convenience, you can automatically remux recordings to MP4. In the Advanced tab under Recording, check "Automatically remux to mp4." This way, OBS converts MKV to MP4 after each recording, giving you the best of both worlds: crash safety and broad software support.
Select the Optimal Video Encoder
Your video encoder choice depends on your GPU. For Nvidia users, select NVIDIA NVENC H.264 (or H.265/HEVC for better compression). AMD users should choose the AMD HW H.264 or H.265 equivalent. If you lack a dedicated GPU, use your CPU's integrated graphics: QuickSync for Intel, or AMD HW H.264 for AMD chips. NVENC offers excellent performance with minimal impact on your system, making it ideal for simultaneous gaming and recording.
Set Rate Control to CQP for Consistent Quality
For recording, use Constant Quantization Parameter (CQP) instead of Constant Bitrate (CBR). CQP ensures consistent visual quality across scenes by varying bitrate dynamically. Set the CQ Level between 16 and 20—lower numbers yield higher quality but larger files. A value of 18–20 is a sweet spot for 1080p60 recordings. If you need smaller files, avoid going above 22. This setting is the most impactful for balancing quality and file size.
Fine-Tune Encoder Settings for Performance
Keyframe Interval: Set to 2 for easier editing; 0 auto-selects but may cause issues. Preset: P5 is a balanced choice; use P7 for best quality on powerful GPUs, or drop to P5 if you encounter encoder overload. Tuning: High Quality. Multipass Mode: Full Resolution (or Quarter Resolution if your GPU struggles). Profile: High. Uncheck Look Ahead, keep Adaptive Quantization checked, and set B-frames to 2. These settings optimize NVENC for high-fidelity recordings.
Optimize Audio and Video Settings
Under Settings > Audio, set your desktop and microphone devices. For best audio quality, in the Output > Recording tab, set Audio Encoder to FFmpeg AAC and bitrate to 320 kbps for each track. If you need to split audio (e.g., separate game and mic tracks), enable multiple audio tracks and assign them in the Advanced Audio Properties. For video, set Base (Canvas) Resolution to your monitor's native resolution (e.g., 1920x1080) and Output (Scaled) Resolution to your desired recording resolution. Use 60 FPS for smooth gameplay. If resolutions differ, select Lanczos downscale filter for best quality.
Troubleshooting Common Recording Issues
If you experience stuttering or encoder overload, reduce the Preset to P5 or switch Multipass Mode to Single Pass. For integrated graphics users, lower the preset to Balanced or Speed. Also ensure your recording path is on a fast SSD, not an HDD, to prevent dropped frames. If game FPS drops, try lowering the CQ level slightly or reducing the resolution. Always test your settings with a short recording before a long session.